


Virtualize TrueNAS with Harvester (and Kubevirt for VM management)
TrueNAS and Harvester HCI (with Kubevirt for VM management), will they be a good combination?


Virtualizing TrueNAS has been a common theme in the homelab world for a long time. However, there are not many discussions on this topic with Harvester as a hypervisor, so I would like to go over my experience doing so in this article.
Virtual machine configuration
Planning
Harvester uses Kubevirt for its virtualization management, so the virtual machines are configured using a Kubevirt YAML template. Before creating a virtual machine, let's sketch out the configuration beforehand.
CPU
A general recommendation is to start with 2 vCPUs and scale them according to your workload and CPU model. In my case, I only use TrueNAS for archiving records, so 2 vCPUs of Ryzen 5 5600G are enough for me.RAM
TrueNAS recommends 16 GB at minimum, and besides, ZFS loves RAM. I am not a ZFS expert by any means, but on experimenting with an 8 GB to 128 GB setup, I see no visible difference to my use case after 16 GB. I can technically run at 16 GB, but I decided to use 24 GB instead to give the machine some leeway.Boot drives
Modern versions of TrueNAS (both Scale and Core) require more than 8 GB for a boot drive, 16 GB is a good starting point. For my installation, I use a 32 GB boot drive to give the OS some overhead, and also, create a second virtual disk to later form a mirror boot drive during TrueNAS installation.Installer drive
TrueNAS ISO ranges about 2 GB or less depending on the version, 5 GB is a good starting point for an installer drive. Make this one asbootOrder: 1
so the virtual machine can boot into that right away. It actually does not need to be the first boot, but from my experience, sometimes this makes the virtual not able to detect the installer drive.Network
For my use case, I bridge the virtual machine with aL2VlanNetworkso it can communicate with my infrastructure. TrueNAS works well with VirtIO, so use it to maximize the performance (usually 3 to 5 times better in throughput compared to emulation).Bind the virtual machine to a specific node
TrueNAS, or more likely ZFS, does not like virtual IO (if at all). Therefore, PCI passthrough is required for all data drives. Enabling PCI passthrough in Harvester means your machine cannot perform a live migration, so you have to schedule the VM on a specific Harvester node.
Side note: There might be a strategy for falling back or migration between multiple virtual machines if you have identical nodes with PCI passthrough enabled, I am not certain how that work at the moment.Boot loader mode
TrueNAS installation supports both Legacy BIOS and UEFI boot modes. By default, Harvester creates a virtual machine with Legacy BIOS with Secure Boot disabled. UEFI boot is an option but from what in my use case, it makes no difference, so use the Legacy BIOS option. Make sure to choose the correct installation type, or else, you will be greeted withBooting to hard diskstuck indefinitely.

YAML configuration
Configure the virtual machine via the Harvester web interface based on this specification, and the final result will resemble the following template.
Side note: This is from Edit YAML, not Edit Config > Edit as YAML. I am not certain about the relationship between those two but changes in one might not reflect in the other, even if they look almost identical.
spec:
  affinity:
    nodeAffinity:
      requiredDuringSchedulingIgnoredDuringExecution:
        nodeSelectorTerms:
          - matchExpressions:
              - key: network.harvesterhci.io/mgmt
                operator: In
                values:
                  - 'true'
  domain:
    cpu:
      cores: 2
      sockets: 1
      threads: 1
    devices:
      disks:
        - bootOrder: 1
          disk:
            bus: virtio
          name: disk-2
          # Note: serial number is defined
          serial: dae05b93-c3c4-4a3e-9ec0-5403f9e70494
        - bootOrder: 2
          disk:
            bus: virtio
          name: disk-1
          serial: ec0082c0-b2ec-4104-96d9-dec3562a6d06
        # Note: cloudinit is missing here
      hostDevices:
        # Note: PCI devices are passed through
        - deviceName: amd.com/500_SERIES_CHIPSET_USB_3_1_XHCI_CONTROLLER
          name: htpc-000016000
        - deviceName: amd.com/500_SERIES_CHIPSET_SATA_CONTROLLER
          name: htpc-000016001
        - deviceName: asmedia.com/1064
          name: htpc-000026000
      inputs:
        - bus: usb
          name: tablet
          type: tablet
      interfaces:
        - bridge: {}
          macAddress: f6:28:ac:32:c2:3a
          model: virtio
          name: br-vlan1-lan
    features:
      acpi:
        enabled: true
    machine:
      type: q35
    memory:
      guest: 24476Mi
    resources:
      limits:
        cpu: '2'
        memory: 24Gi
      requests:
        cpu: 125m
        memory: 16Gi
  evictionStrategy: LiveMigrate
  hostname: truenas-core
  networks:
    - multus:
        networkName: default/vlan1-lan
      name: br-vlan1-lan
  nodeSelector:
    kubernetes.io/hostname: htpc
  volumes:
    - name: disk-2
      persistentVolumeClaim:
        claimName: zfs-truenas-core-2
    - name: disk-1
      persistentVolumeClaim:
        claimName: zfs-truenas-core-1
Actually, this template is after I finish setting up TrueNAS, so it is a bit different than your brand new YAML template. Let's talk about the differences.
Missing installer , and cloudinit disks
When the TrueNAS installer runs, you will see 3 different disks: vtbd1, vtbd2, vtbd3. Aside from the installer, there should only be 2 drives for boot, which are vtbd1: zfs-truenas-core-1, and vtbd2: zfs-truenas-core-2. Meanwhile, the vtbd3: cloudinit, is hidden from Harvester web GUI but is visible in the YAML config. It is responsible for managing and applying a configuration in the first boot of the virtual machine.

After using vtbd1, and vtbd2 as boot drives, installer and cloudinit becomes redundant and can cause certain issues, so they are removed just in cases.
Drives have serial numbers.
The boot drives are virtual, so by default, they do not have associated serial numbers. TrueNAS uses serial numbers as a way to keep track of drives, so without the identifier, certain operations such as creating a new pool are not possible (at least via the web GUI), even if your pool does not consist of the unidentified drive.
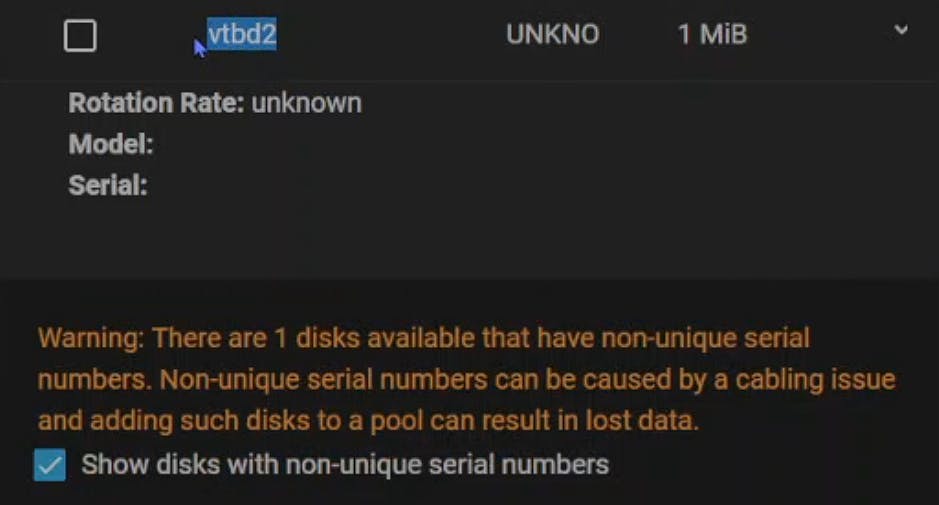
For example, vtbd2 here is the cloudinit (number changes due to different boot environments). Before it is unmounted, a warning is shown in TrueNAS and that prevents pool creation. The same applies to the boot drives. Even though they do not appear in the warning if they do not have a unique serial number, no operation can be completed.

Harvester does not expose a mechanism to set a serial number for drives via web GUI, so I manually adjust the Kubevirt YAML config and add the serial property (with UUID). TrueNAS is perfectly happy with that.
disks:
  - bootOrder: 1
    disk:
      bus: virtio
    name: disk-2
    # Note: serial number is defined
    serial: dae05b93-c3c4-4a3e-9ec0-5403f9e70494
  - bootOrder: 2
    disk:
      bus: virtio
    name: disk-1
    serial: ec0082c0-b2ec-4104-96d9-dec3562a6d06

PCI device devices are passed through.
Depending on your hardware, the PCI passthrough experience might differ. I did go over this a bit in my previous article on deploying an OpenWRT firewall in Harvester. For my motherboard, which is MSI PRO B550M-VC WIFI, let's have a look at the block diagram below (from the motherboard manual).
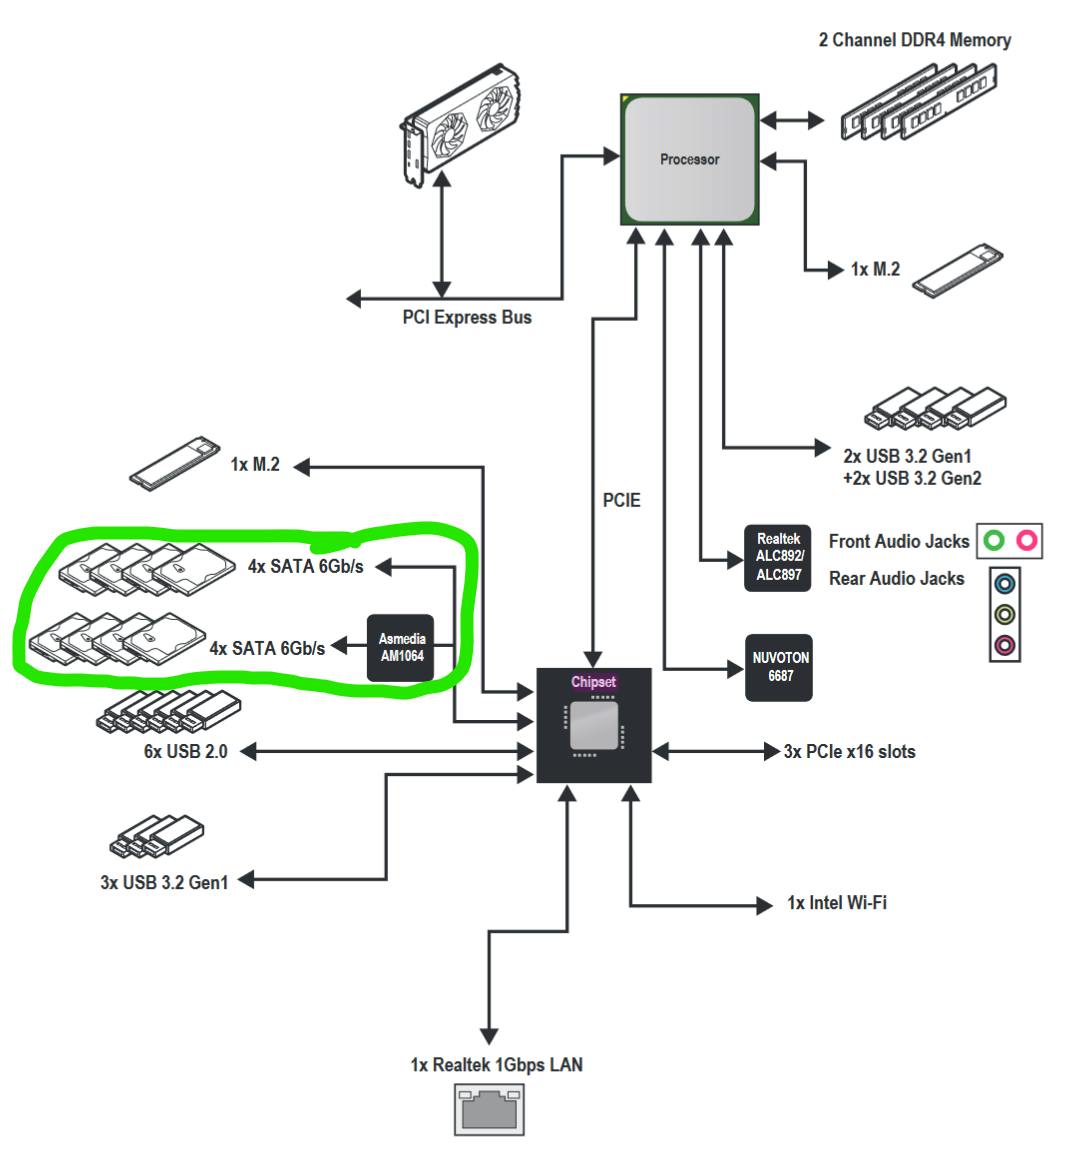
I have to pass through the section circled in green so TrueNAS can see the drives. There are some rules when passing through PCI devices.
All devices in an IOMMU group must be passed through. Their group can be determined by looking at the device address. Generally, devices in the same
domain:busare in a group. However, it is best to look at/sys/kernel/iommu_groups/(F12 to access Harvester's node console), to see which device belongs to which group. Many times, devices with differentdomain:busaddresses can be in the same group too.It is not necessary to make all passed-through devices available to the virtual machine. Instead, some will even prevent the virtual machine to boot or causes random errors or behaviors. In extreme cases, a node failure may happen. I guess the extreme cases happen because an errored device overwhelms the logging and I/O of the node, hence node failure. Just make what is needed available by cherry-picking them.
All devices in the same
domain:busmust be made available to the virtual machine, or else it cannot boot.
So with that, I choose the following devices (all in IOMMU group 12).

But only make 3 of them available to the virtual machine, because the other two PCI devices can make my node fail. The failure causes all sorts of issues like management address becoming unavailable, node not responding, and having to reboot, etc.
hostDevices:
  - deviceName: amd.com/500_SERIES_CHIPSET_USB_3_1_XHCI_CONTROLLER
    name: htpc-000016000
  - deviceName: amd.com/500_SERIES_CHIPSET_SATA_CONTROLLER
    name: htpc-000016001
  - deviceName: asmedia.com/1064
    name: htpc-000026000
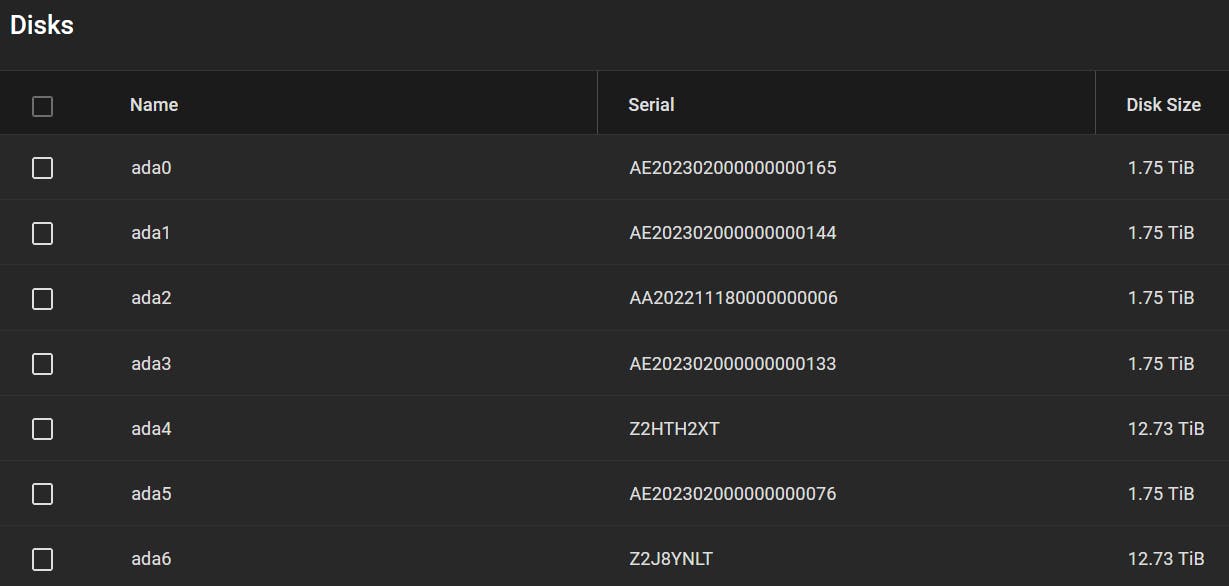
It may have been easier if I use my IBM M5110/LSI 9207-8i (SAS 2308, IT mode), but it makes no difference in the end for me. My disks eventually look like this, and the performance at default is very reasonable considering the overhead of virtualization. I guess it can still be further improved.
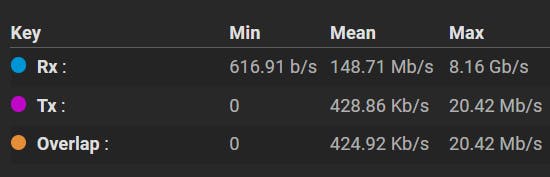
Side note*: The test runs only a few seconds, hence the skewness in its statistics. That said, the max throughput can reach close to 9 Gbps at one point on a 5 x 2 TB SSD pool, RAID-Z2.*
Miscellaneous details about TrueNAS installation
Standard first-boot procedure
When I first log in to TrueNAS installation, there is a standard procedure I use to set the machine up.
Set static IP, DNS, and default gateway (required for Internet access).
Install the latest update.
Create a client account to access a network share.
Move system dataset to boot pool.
Enable 2FA.
For the SMART tests, schedule a weekly LONG test, and a daily SHORT test.
For snapshots, schedule a daily task.
For scrubbing, schedule a weekly task.
Create a pool, data set, set user permission (OPEN template), enable SMB service, and create a share.
The below are optional, because they are not critical in a homelab environment, but are generally a must in production.
Disable the root account and use an admin account instead.
If using SSH, harden SSH authentication by disabling password login and enabling the public key requirement.
Set up an encrypted email notification.
Granularly configure alert settings.
Configured a verified SSL connection.
Schedule a replication task for a different system.
Schedule a cloud sync task for an off-site backup (3-2-1 strategy at minimum).
Modify ACL for granular access permission.
"This system does not support virtualization" error
At Harvester v1.1.2, it seems virtual machines on some AMD platforms cannot detect nested virtualization. This might relate to Harvester issue #3900, but that issue is categorized as a user interface bug only. Besides, I can run virtual machines on my Ryzen 5600G node normally (with SVM, IOMMU, and SR-IOV enabled, while /sys/module/kvm_amd/parameters/nested returns 1).
Up to this point in the article, I have been generalizing the TrueNAS version because both Core and Scale should be relatively the same. In fact, my first try is to migrate my bare metal TrueNAS Scale instance. It has some virtual machines and apps, but the migration to Harvester virtual machine is not without an issue. After the migration, TrueNAS Scale virtual machines are now nested virtualization, and they simply break the web GUI operations.

Essentially, TrueNAS Scale virtual machines cannot work in my nested environment. When I want to do any operation via the web GUI, such as creating a new pool, or new data set, this error shows up and interrupts the operation. However, operations via shell are not affected, nor are any other underlying features. For example, I import the pool via shell, and network sharing performs without a hassle. Apps also start automatically and are accessible via LAN connection, but are not modifiable via TrueNAS Scale web GUI.
As now I use Harvester as a hypervisor type 1, I figure TrueNAS Scale is not the most optimal choice considering its bleeding edge nature. Therefore, I go back to TrueNAS Core, which has been battle-tested in the last decade and is widely considered a feature completed by this point. The TrueNAS Scale is only my playground, so there is no issue for me to completely wipe it off and move to the Core. I suppose a similar issue might raise again if I decide to enable virtualization on the current TrueNAS Core installation, so I leave it untouched.
Wrap up
Originally, I dedicate the whole Ryzen 5600G node to a TrueNAS Scale bare metal installation. It has no issue but is certainly not a good utilization of the hardware. The current configuration makes no difference, and besides, it helps me learn a lot more about configuring virtual environments.
This labwork also makes me recognize one important thing: "Searching for Harvester information is not always the way to go". This is because Harvester consists of many different components, such as the underlying Linux OS, Kubernetes, Kubevirt, Longhorn, and so on. When I face issues with virtual machines, it is better to search for the answer in Kubervirt context, like: "XYZ error in Kubevirt", not "XYZ error in Harvester".
That's all for now. I wonder what would be a fun topic to learn about next!
If you find this article to be helpful, I have some more for you!
Is Harvester a good hypervisor for a beginner? My hands-on experience
Deploy a virtualized OpenWRT firewall in Harvester, how did it go?
And, let's connect!