

Deploy a virtualized OpenWRT firewall in Harvester, how did it go?
I decided to virtualize my infrastructure, and the first step was to put my OpenWRT firewall into the Harvester cluster.


In my previous article, Is Harvester a good hypervisor for a beginner? My hands-on experience, I tried out Harvester as a virtualization platform for my multi-node homelab. The experience was not flawless, but that is to be expected in a homelab environment. In this article, I will go over my experience setting up an OpenWRT firewall for my 1-gigabit fiber connection in a virtual machine (VM) in Harvester. There are some guides for configuring OpenWRT, but they are not full-on tutorials (many details were omitted). In a sense, this is more about my findings on working with Harvester.
OpenWRT, on an x86 machine?
Talking about firewalls with routing capabilities in the homelab scene, pfSense, and OPNSense are the usual recommendations. They are great products, and I also use pfSense in a production environment. That said, networking is not my specialty, nor the focus of my homelab. I only need a few features such as VLAN and QoS, pfSense, and OPNSense are practically overkill for me.
I had been using off-the-shelf OpenWRT-flashed routers for years. If the solution can put up a decent performance while maintaining up-to-date security guards, that is more than enough for me. OpenWRT fits the bill, and it is Linux-based, which I am more familiar with. Therefore, I looked into the idea of using OpenWRT on an x86 platform, and surprisingly, it is possible. The OpenWRT team also has a dedicated page for the x86 platform, which for some reason, I have not been aware of up till now. For the VM, I used openwrt-22.03.5-x86-64-generic-ext4-combined-efi.img, the latest version at the time of writing.
Configuring a VM for the firewall, a long story...
The YAML snippet below is my configs. Unnecessary information is removed to make it more concise
apiVersion: kubevirt.io/v1
kind: VirtualMachine
...
spec:
    ...
    spec:
      affinity: {}
      domain:
        cpu:
          cores: 2
          sockets: 1
          threads: 1
        devices:
          disks:
            - bootOrder: 1
              disk:
                bus: virtio
              name: disk-0
            - disk:
                bus: virtio
              name: cloudinitdisk
          hostDevices:
            - deviceName: intel.com/ETHERNET_CONNECTION_5_I219LM
              name: harvester-ha2-0000001f6
            - deviceName: intel.com/200_SERIES_Z370_CHIPSET_FAMILY_SMBUS_CONTROLLER
              name: harvester-ha2-0000001f4
            - deviceName: intel.com/200_SERIES_PCH_LPC_CONTROLLER_Q270
              name: harvester-ha2-0000001f0
            - deviceName: realtek.com/RTL8125_2_5GBE_CONTROLLER
              name: harvester-ha2-000001000
          ...
          interfaces:
            - macAddress: 52:54:00:de:03:c1
              masquerade: {}
              model: virtio
              name: default
          ...
        machine:
          type: q35
        memory:
          guest: 924Mi
        resources:
          limits:
            cpu: '2'
            memory: 1Gi
          requests:
            cpu: 125m
            memory: 682Mi
      evictionStrategy: LiveMigrate
      hostname: openwrt
      networks:
        - name: default
          pod: {}
      nodeSelector:
        kubernetes.io/hostname: harvester-ha2
      volumes:
        - name: disk-0
          persistentVolumeClaim:
            claimName: openwrt-disk-0-e9h90
        - cloudInitNoCloud:
            networkDataSecretRef:
              name: openwrt-hilki
            secretRef:
              name: openwrt-hilki
          name: cloudinitdisk
status:
  conditions:
    ...
    - lastProbeTime: null
      lastTransitionTime: null
      message: VMI uses a PCI host devices
      reason: HostDeviceNotLiveMigratable
      status: 'False'
      type: LiveMigratable
...
Virtual hardware specification
Which node to run on?
My Harvester cluster consists of 3 nodes, in which the second node is a medium form factor computer with 3 network interface controllers (NIC), while the other nodes only have 1 NIC each. Technically, it is possible to set up OpenWRT with only 1 virtual NIC, shared between host and guest OS, and utilize the high availability (fallback) feature of a Harvester cluster, but I decided not to do so for now. Because this VM is for a firewall, it sorts of creates a chicken-and-egg issue, so using only 1 NIC will complicate the setup quite a bit since it involves configuring VLAN and virtual NIC for the VM. I may try that out down the road, but for now, running on the second node with PCIe passthrough is my choice.
CPU
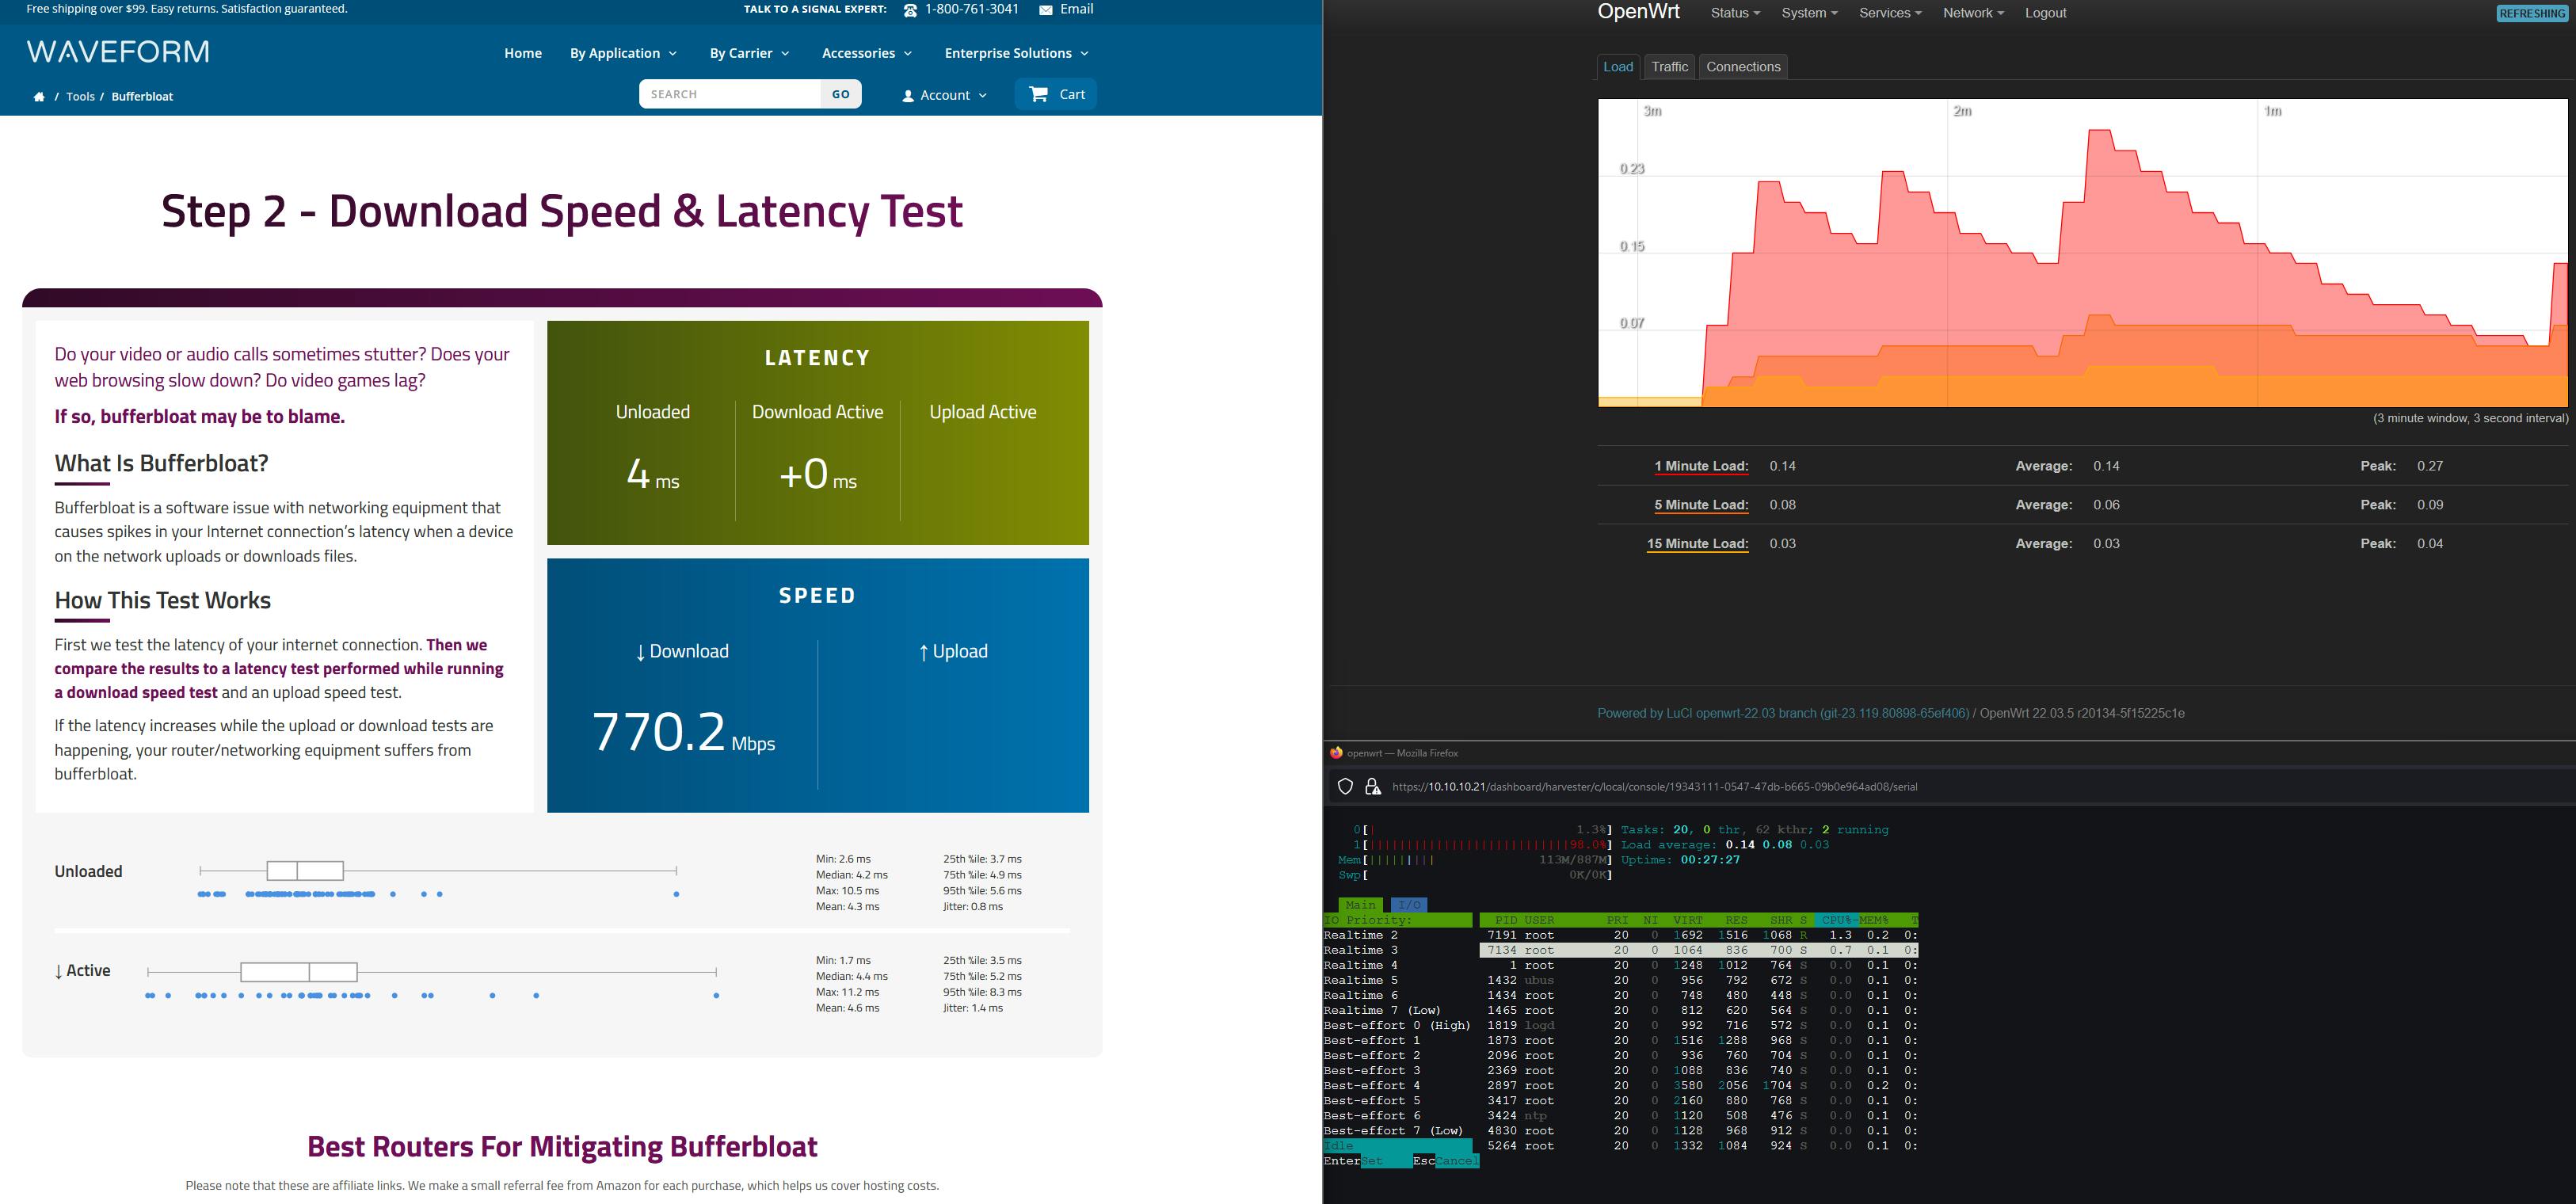
For this OpenWRT VM, I decided to go with 2 virtual cores. Actually, I tried out with only 1 virtual core, but that made the LAN to WAN performance inconsistent. With 1 core, fresh installation, and no additional service enabled (e.g., AdBlock, QoS), the LAN to WAN throughput ranged from 400 Mbps to 900 Mbps inbound and outbound. With 2 cores enabled, the performance has been consistent at around 800 - 900 Mbps with many additional services enabled. One thing to keep in mind, my second node has an Intel i5-6500 CPU, which is not a powerhouse by any means, so the performance is strictly applied to this CPU only.
Memory
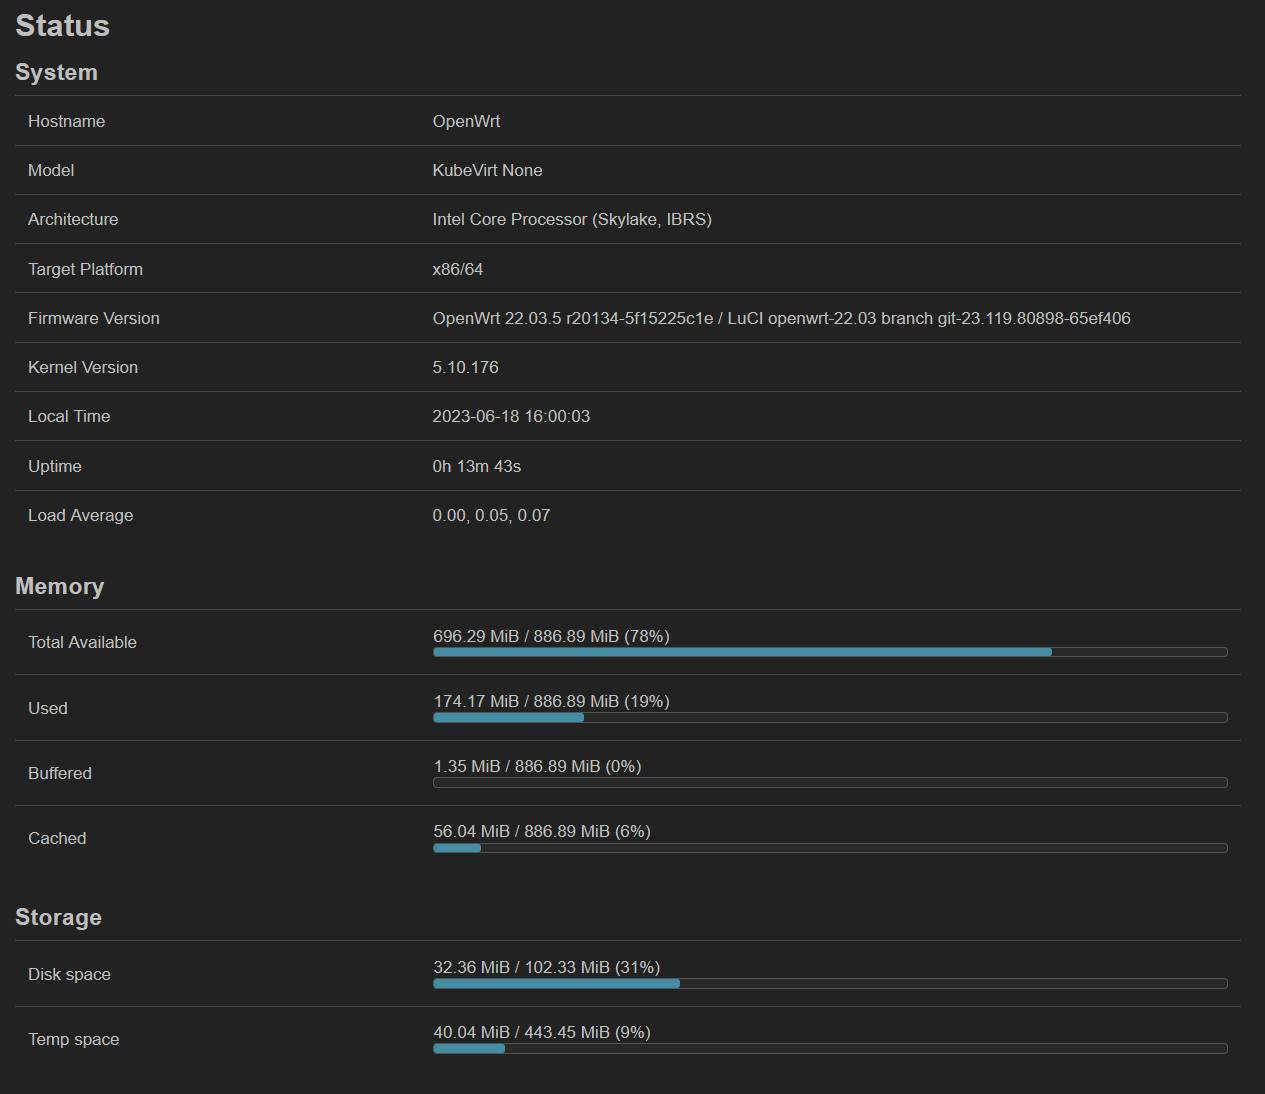
OpenWRT has a very small memory footprint and only consumes under 120 MB at fresh installation. That is understandable because OpenWRT is designed for consumer all-in-one devices with minimal hardware, it just so happens that the OS is compilable to x86 so here we are. Therefore, 1 GB of memory is more than enough for my use case. I probably will never consume over half of that though
Disk size
Depending on your use case, you may require more drive space than me (e.g., for logging). Generally, the same story as memory applies here. OpenWRT installation consumes around 128 MB, so 1 GB for the installation is overkill. By default, OpenWRT does not even use all available drive space, and users must expand the root partition manually. Not that I need all available space though, so I tried to create an under-1 GB volume, but Harvester does not allow that.
# 1 GB is the minimum disk size you can choose.
# Chossing a smaller value (e.g., 0.256 GB) causes the following error.
disk-0: Exceed maximum size 999999999 GiB!
NIC
The second node has 3 NICs: Intel I219-LM, Realtek RTL8125 (only 8125, neither rev. A nor B), and Intel X710 DA-2. The X710 is a management NIC, so I passed through the I219-LM and RTL8125. The x86 image supports both of these ethernet controllers out-of-the-box, separate driver installation is not necessary. It is also possible to utilize VLANs to set up WAN and LAN on 1 NIC, but that is a story for another day.
# RTL8125 uses kmod-r8169, and I219-LM uses kmod-e1000.
# The below are drivers bundled in the OpenWRT x86 image.
# Source: https://github.com/openwrt/openwrt/blob/3556455f040341099a6563968a6e9e8c22c0847e/target/linux/x86/image/64.mk#L6

DEVICE_PACKAGES += \
    kmod-amazon-ena kmod-amd-xgbe kmod-bnx2 kmod-e1000e kmod-e1000 \
    kmod-forcedeth kmod-fs-vfat kmod-igb kmod-igc kmod-ixgbe kmod-r8169 \
    kmod-tg3
Although there are stories of people having terrible experiences using these NICs in OpenWRT (e.g., packet drop, kernel panic, etc.), they had been working fine on bare metal for me, so virtualization should be the same, right? Well, I did hope for that..., but I eventually decided to swap the roles of X710 and RTL8125. Let's talk more about it below.
PCIe passthrough is straightforward but with caveats
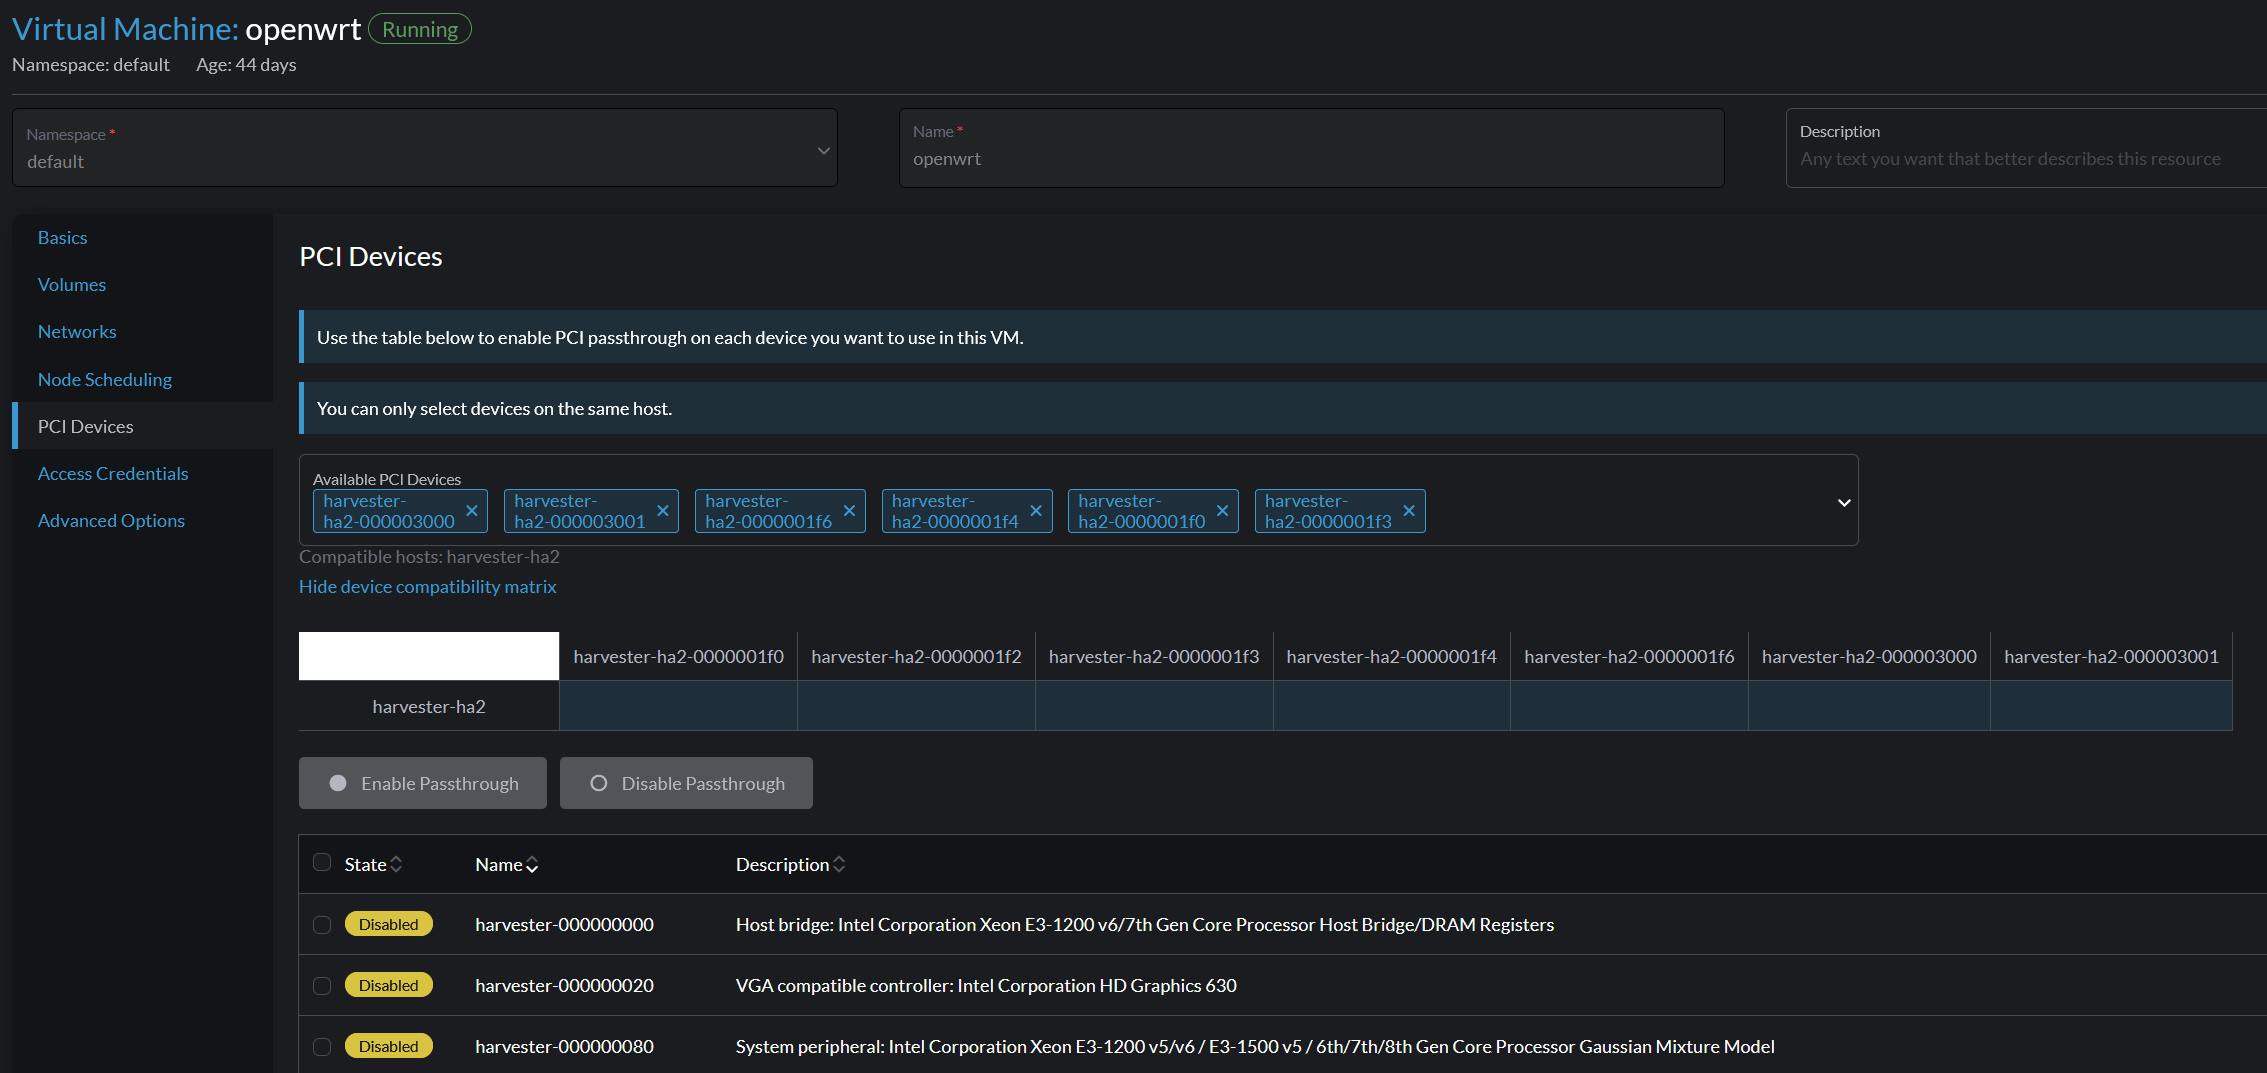
Harvester offers PCIe passthrough out-of-the-box, but at the time of writing, this feature is still experimental. PCIe passthrough is accessible via Virtual machine config > PCI Devices web GUI, and the feature just takes a few clicks to enable (assuming your hardware supports that, e.g., VT-d, IOMMU, etc.) There is a technical difference between PCI and PCIe terminologies, but I will use the term PCIe devices in the following sections.
So, I went ahead and passed through my NICs without any issues, or at least, not yet...
RTL 8125 does not like being passed through in Harvester
At first sight, the RTL8125 NIC could be passed through easily, and indeed, it was. I could fully utilize it in my OpenWRT VM without any performance drop, hangs, or equivalent issues. Well, until I decided to reboot my VM.
In virtual machine events
Reason: Sync Failed
Resource: VirtualMachineInstance openwrt - Server error.command SyncVMI failed: "LibvirtError(Code=1, Domain=0, Message="internal error: Unknown PCI header type '127' for device '0000:01:00.0")"
A very cryptic error message, but in short, the VM was not bootable. This usually happens whenever I reboot the VM by any means (e.g., via OpenWRT GUI, power off and start in Harvester GUI, etc.) Alongside, there were all sorts of random problems when this error message appeared such as:
VM became unresponsive to actions (via web GUI) like power off, restart, delete, edit-config, and so on.
VM was indefinitely stuck at Starting state.
Node became unresponsive.
I was not able to reliably reproduce the issue, and still do not know the reasons behind that. From the research I made, all I can say is it has something to do with the virtual machine type (q35), its virtual BIOS, and the NIC itself is stuck in a certain state.
# dmesg on the second node.
vfio-pci 0000:01:00.0: Refused to change power state, currently in D3
Rebooting and unplugging the node (to discharge) a few times can resolve this. Technically, it is not a big deal if the VM stays online for a long period. However, I was in the tinkering phase, so the issue got on my nerves due to its random nature. That is why, I eventually turned RTL8125 into a management NIC, while dedicating the X710 to my VM. I had to reinstall Harvester, but at least, I have not faced the same problem since then.
But ... it did not stop there
I think if you have extensive knowledge of K8s, the following error messages tell something. To a newcomer like me, they are more or less comparable to reading an AES-256 encrypted message. I did spend a good amount of time searching for these error messages but yielded no results. I guess that is because these messages are somewhat specific to Harvester's usage of K8s. Considering there are not many online resources about the platform at the moment (relative to equivalent solutions like VM Ware or Proxmox), probably I need to dig even deeper to find out the answers.
Here are some generic errors that I faced when enabling PCIe passthrough. The same as the RTL8125 story mentioned above, the following errors randomly appear. Essentially, they prevent the VM from completing an action, such as starting, or stopping. They may go away after some time, or get stuck there indefinitely and require a node reboot. The error messages are notified via several ways, such as pop up, VM events, statuses, etc. I do not use a coding textbox below because they are very long messages, and I am not sure if it consists of many different ones. Harvester does not give any new lines though.
0/3 nodes are available: 3 node(s) didn't match Pod's node affinity/selector.preemtion: 0/3 nodes are available: 3 Preemtion is not helpful for scheduling
Error: Stop virtual machine default/openwrt failed, Operation cannot be fulfilled on virtualmachine.kubevirt.io "openwrt": Halted does not support manual stop requests
FailedAttachVolume: Pod virt-launcher-openwrt AttachVolume.Attach failed for volume "...": rpc error: code = Internal desc = Bad response statusCode[500]. Status [500 Internal Server Error]. Body: [code=Server Error, detail=, message=unable to attach volume ... to harvester-ha2: node harvester-ha2 is not ready, couldn't attach volume ... from [longhorn-backend:9500/v1/volumes/...?action..
0/3 nodes are available: 1 Insufficient devices.kubevirt.io/kvm, 1 Insufficient devices.kubevirt.io/tun, 1 Insufficient devices.kubevirt.io/vhost-net, 1 insufficient intel.com/200_SERIES_PCH_LPC_CONTROLLER_Q270, 1 Insufficient intel.com/200_SERIES_Z370_CHIPSET_FAMILY_SM.., 1 Insufficient intel.com/ETHERNET_CONNECTION_5_I219LM, 1 Insufficient realtek.com/RTL8125_2_5GBE_CONTROLLER, 2 node(s) didn't match Pod's node affinity/selector.preemption: 0/3 nodes are available: 1 No preemption victims found for incoming pod, 2 Preemption is not helpful for scheduling.
0/3 nodes are available: 1 Insufficient CPU
Unable to retrieve container logs for containerd://...
All devices in the same IOMMU group must be passed through
This is not an issue with Harvester but is more about how the platform handles it. When passing through a PCIe device, all in the same IOMMU group must be passed through unless Access Control Service is enabled (which I do not have). It is not necessary to activate all passed-through devices though. In Harvester, there is no clear indicator for which IOMMU group a PCIe device belongs, but it can be determined using the Address column on the PCI Devices page.
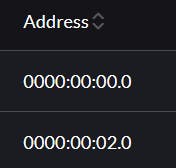
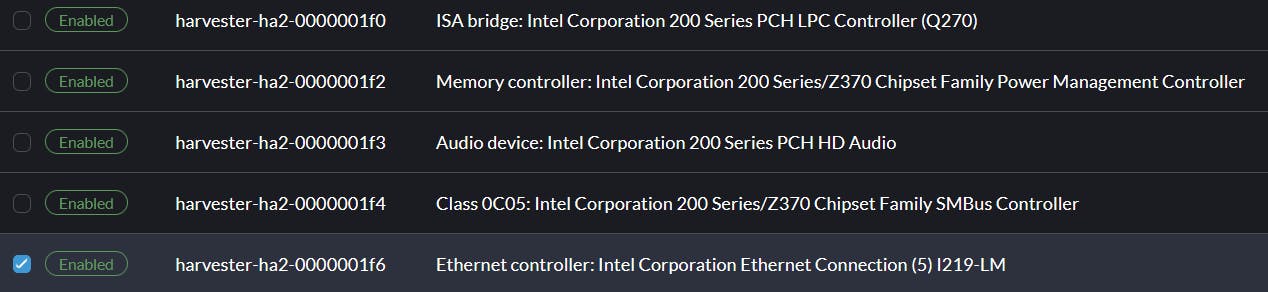
The addresses follow a Bus, Device, Function (BDF notation) for PCI Domain, which consists of 3 parts: Domain (0000), Bus (00), Device (02), and Function (0). All devices that have the same Domain:Bus:Device sections, they are in the same IOMMU group. Another way to check is to look at a device name because Harvester by default uses a format of node name-address as a convention. For example, in the picture below, I passed through all devices in the group0000:00:1f .
Here is a thing, when a device is not passed through probably, there is no indicator. I faced three different scenarios that are related to this:
Devices stuck in In Progress state.
Devices are shown as Enabled, but in fact, are not visible in the VM.
And I simply forgot to pass through one device.
In these cases, the VM could not boot up, or bootable but stuck in Starting state and became unresponsive. There were no indicators, no logs, nothing. Admittedly, I only used web GUI, so maybe something could be seen if using the terminal. This is not a good user experience in my opinion.
On a side note, although I passed through 5 devices in this IOMMU group as shown in the picture, I must not activate the Power Management Controller (0000:00:1f.2). Activating that device always makes my VM not bootable and throws the following error message.
1. 0/4 nodes are available: 1 Insufficient intel.com/200_SERIES_Z370_CHIPSET_FAMILY_PO.., 3 node(s) didn't match Pod's node affinity/selector.preemption: 0/4 nodes are available: 1 No preemption victims found for incoming pod, 3 Preemption is not helpful for scheduling
Setting up OpenWRT for the gigabit network
Alright, I have been focusing on Harvester up to this point, let's briefly shift the focus to my experience on configuring the OpenWRT for my 1-gigabit line. To do so, I accessed the VM via Harvester serial console and modify the network config file, then ran the command service network restart to apply changes. Note, it was restart in my case, as reload did not work.
# vim /etc/config/network

# These are default OpenWRT config, no need to modify
config interface 'loopback'
        option device 'lo'
        option proto 'static'
        option ipaddr '127.0.0.1'
        option netmask '255.0.0.0'

config globals 'globals'
        option ula_prefix 'fd6c:3930:3b2c::/48'

# Add your customize configs down below
config device
        option name 'br-lan'
        option type 'bridge'
        list ports 'br-vlan.1'

# I could add eth3 to use as a backup NIC
# but I just did not do so
config device
        option type 'bridge'
        option name 'br-vlan'
        list ports 'eth2'
        option bridge_empty '1'

config bridge-vlan
        option device 'br-vlan'
        option vlan '1'
        list ports 'eth2:u*'

config interface 'lan'
        option device 'br-lan'
        option proto 'static'
        option ipaddr '10.10.10.1'
        option netmask '255.255.255.0'
        option ip6assign '60'

config interface 'wan'
        option type 'bridge'
        option proto 'pppoe'
        option username 'your-username'
        option password 'your-password'
        option device 'eth1.201'
        option ipv6 'auto'
So, what led me to perform these changes in the first place?
OpenWRT uses a classic unpredictable naming scheme (eth0, 1, 2, etc.) From my understanding, whichever is closer to the CPU goes first. With an educated guess,
eth0is a virtual NIC from Harvester,eth1is an onboard NIC Intel I219-LM andeth2,eth3is for X710-DA2. I used the I219-LM for WAN and one port of X710 for LAN.You may wonder why I did not use two NICs of X710-DA2 for WAN and LAN. It is because I do not have a compatible SFP+ to multi-gig RJ45 NIC for the X710.
# X710-DA2 driver and firmware (NVM) blocks unbranded SFP modules.
# You will not see this issue before installing X710 driver though.
kern.err kernel: [  415.070583] i40e 0000:02:00.0: Rx/Tx is disabled on this device because an unsupported SFP module type was detected.
kern.err kernel: [  415.070831] i40e 0000:02:00.0: Refer to the Intel(R) Ethernet Adapters and Devices User Guide for a list of supported modules.
After this, my WAN was up and the OpenWRT instance had access to the Internet, but that was just the start. I ran the following commands right after.
# Retrieve package list from OpenWRT.
#
# The less packages (and size), the better
# because that reduce attack surface.
opkg update
# Install driver for x710-DA2.
# This allows eth2 and eth3 to appear.
opkg install kmod-i40e
# This package contains several security patches.
# E.g., Meltdown, Spectre, etc.
#
# There is an equivalent package for different platforms too.
opkg install intel-microcode
# This is for DNS logging, and can be substitue with tcpdump-mini.
opkg install tcpdump
# Network-wide adblocker, this utilize tcpdump.
#
# If a package name is prepended with luci-app
# it provides a web GUI.
opkg install luci-app-adblock
# OpenWRT on x86 does not have a firmware flash feature.
# In other words, an upgrade is a complete reinstallation
# of the OpenWRT image.
#
# The package below allows an in-place upgrade for OpenWRT
# while preserving packages and settings.
opkg install luci-app-attendedsysupgrade
# Network-wide DNS enforcer.
# Test config at: https://www.dnsleaktest.com/
opkg install luci-app-https-dns-proxy
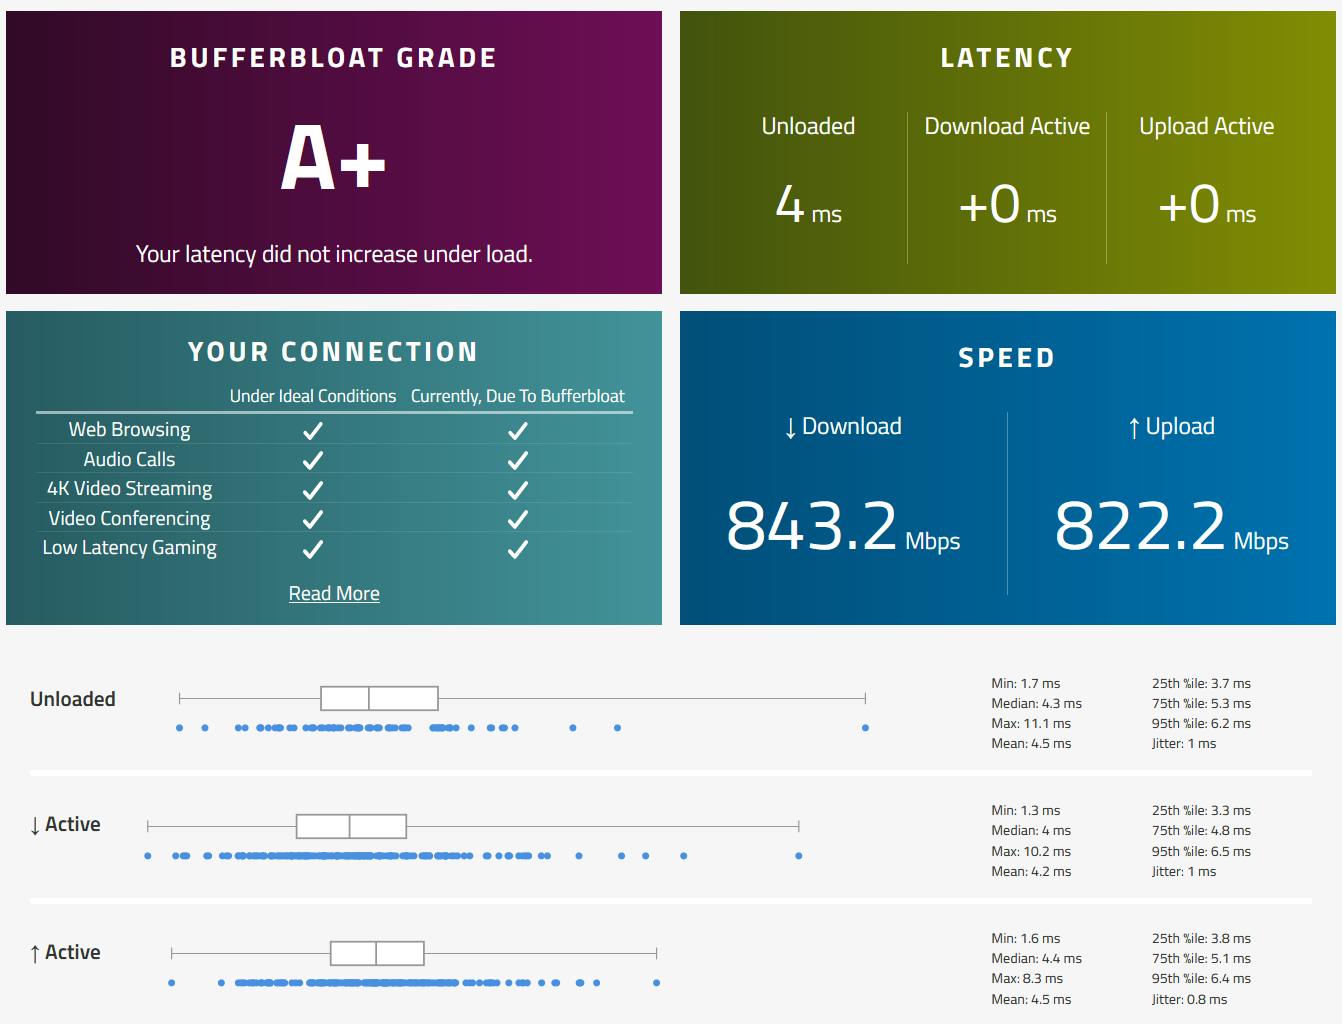
# Mitigate bufferbloat.
# Test config at: https://www.waveform.com/tools/bufferbloat (or DSL report)
opkg install luci-app-sqm
These packages can be configured either via serial console, or via the web GUI, but I will skip over the tutorials for that. To be frank, I am more of a power user with basic domain-specific knowledge in this regard, meaning I am aware of which toggle to turn on, and which number to put in. However, I do not have a deep networking background to explain those options, hence my explanation might not be the best. If you want to learn more, the OpenWRT documentation is a good starting point.
The result
There is a saying, a picture says a thousand words. Here are some tests I performed on the OpenWRT VM.
Web GUI, notice the system information?
Waveform bufferbloat test result.
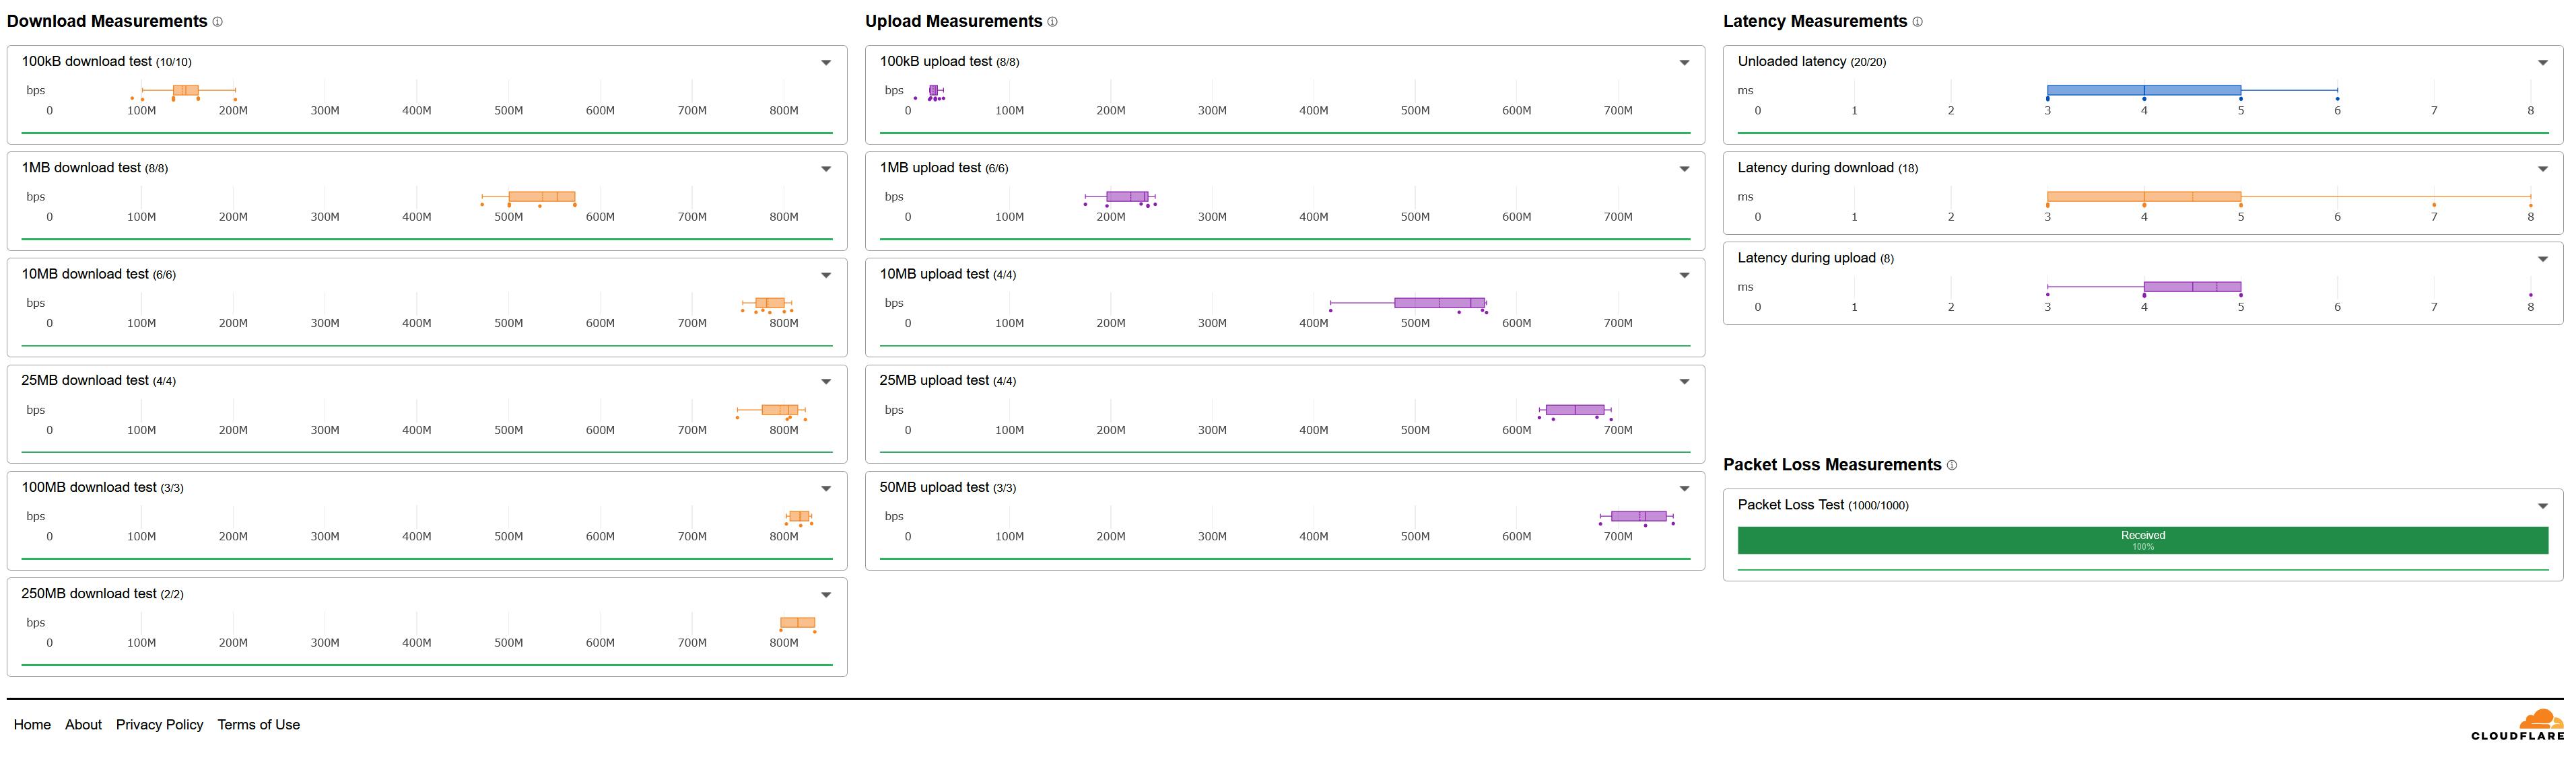
Cloudflare network test result

iperf3 from client to OpenWRT result

iperf3 loopback result

Conclusion
It was a wild ride but at last, I have been able to use this VM firewall full-time. When it runs, the performance is miles ahead compared to off-the-shelf routers, the only hiccups that I still occasionally face are random errors when rebooting the machine.

Again, this is not a huge deal breaker to me as I do not play around with networking that much in my homelab. Considering there is no measurable difference between a virtualized firewall with bare metal installation, it is certainly worth a try. Theoretically, there are security implications when virtualizing the firewall though, but I suppose I am not the best person to discuss that.
I am currently working on virtualizing TrueNAS and deploying websites on my Harvester cluster, they might be good ones to talk about in my future articles.
If you find this article to be helpful, I have some more for you!
Is Harvester a good hypervisor for a beginner? My hands-on experience
Amplication vs Supabase vs Appwrite, for an effortless back end
Bootstrap a simple back end with a user notification feature using Novu and Amplication
And, let's connect!